
Hi there, and welcome to the docs on syncBot. Check out the table of contents, and follow along as I tell you about the bot, and how to get it up and running.
What Can it do?
The first thing i’d like to address is whether this bot does what you are looking for! Below you will see the two different bots you can run based on what your need is.
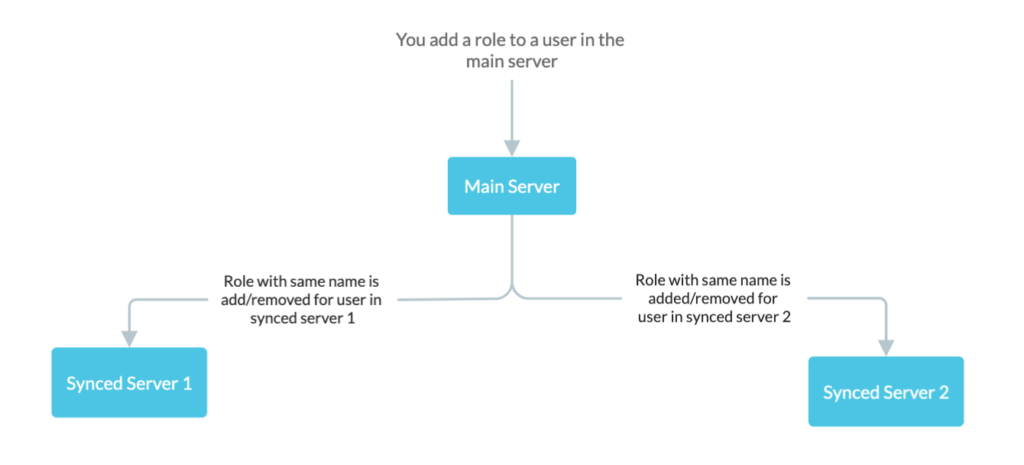
a one to many sync
This is what you would want to run if you have a single main server that you manage roles in. As you manage roles in that main server, the bot will look up the user in each of the servers you have synced and apply the same role actions you took in the main server.
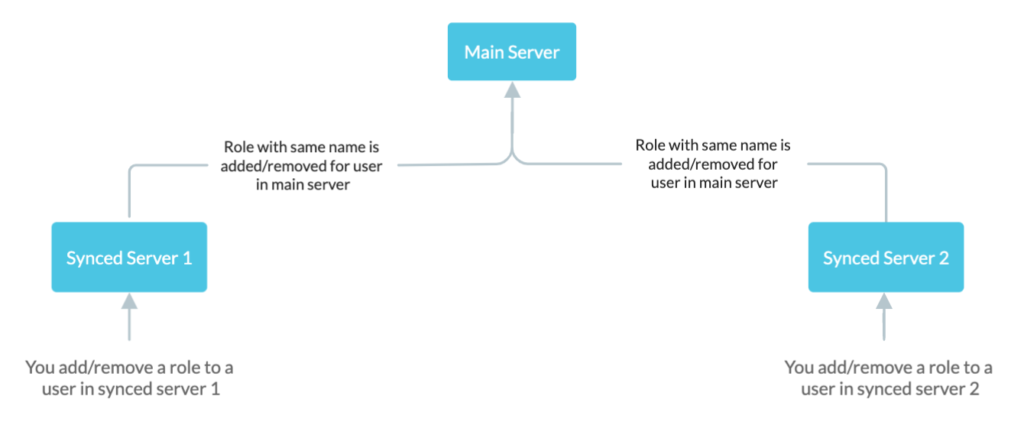
a many to one sync
This is what you would want to run if you have multiple servers that you manage roles in. As you manage roles in each of the synced servers, the bot will look up the user in the main server and apply the same role actions you took in the synced server.
Prerequisites
There are a few prerequisites that you need to take into account.
- If you would like to use a bot I have hosted, it is $5 a month, and you can reach me through discord
- You will need a 24/7 server to run this bot. There are many different providers you can choose from, but it is up to you to make that decision
- The only requirement for the bot is installing node
- node v16.11.1
- The only requirement for the bot is installing node
Creating the Discord Application
If you are familiar with creation a Discord Bot Application it is very likely you can skip this section, the only important pieces are.
Important Bot Settings
– Bot needs Server Member and Server Presence Intents enabled.
– After the bot has been added to your servers, move their role above others in the hierarchy.
– Make sure that the bot has read message / send message permissions on the log channel you create.
There are many better tutorials than this on how to create a Discord application, but I’ll add a quick list.
- Create a Discord Bot at https://discord.com/developers/applications
- Click New Application
- Enable Presence Intent and Server Members Intent
- So that we can sync roles as new members join and leave the servers
- On the left hand side click Bot
- Click Ok
- Note down the Token for use in config.json below
- Click OAuth2 in the left sidebar, General
- Note down the client id for use in config.json below
- Click OAuth2 in the left sidebar, Url Generator
- In the Url Generator
- in the scopes section
- select “bot” and “application.commands”
- in the bot permissions section
- “manage roles” & “view audit log”
- in the scopes section
- Copy the URL in the bottom of the “scopes” section and paste it into your web browser
- You will need to use the url to invite the bot to ALL servers you want synced
- This includes the main server, and all synced servers
- IMPORTANT: After the bot has joined your server, make sure the bot’s role in EACH of your discord servers is located above the roles you want synced in the role hierarchy.
Getting Started
The Config File – Explained
In the code files you fetched from the syncbot github, there is a file named config.example.json This is the file that you need to update with your bots various data, and then save as config.json
Edit config.example.json and save as config.json
Warning, if you have forked the syncbot repo, do not commit this file to your repo as it contains sensitive data.
To make filling in the config file easier, I would highly recommend enabling discord developer mode. It simply adds menu items to lists in discord giving you access to different ids.
How to – Enable discord developer mode
In discord, click the settings cog by your username -> Advanced -> Developer Mode Toggle
Enter the bot token
You can find your bots token by going to https://discord.com/developers/applications
- Select your Application
- Select Bot on the Left
- If you noted down the token in the creation of the bot above, paste it here, otherwise you can reset and copy the token.
"token": "OTt024H3729NjQ4Njkx.YjSn7A.something97ai3k0aU723GTJ4"
Enter the application id
Your bot application id and client id are the same number. It can be found in General Information as Application Id, or in OAuth2 -> General as Client Id. Copy either of these values into your config file.
"applicationId": "123456789123456789"
Enter the main server id
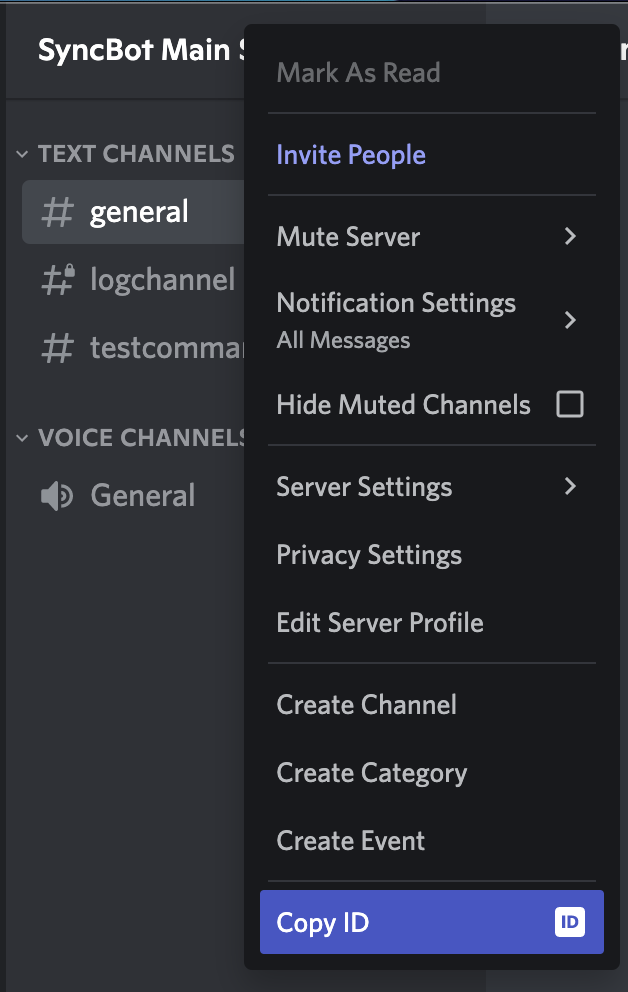
Copy the id of the main server into config.json “mainServer” by right clicking the server name in discord.
"mainServer": "123456789123456789"
Enter the synced server id’s
Copy the id(s) of the servers you want to sync roles between into config.json syncedServers by copying the id’s the same way as the previous step.
If you only have one server to sync
"syncedServers": ["123456789123456789"]
If you have multiple servers to sync
"syncedServers": ["12345678916789", "39876512344321"]
Enter who gets to use the /commands
First note: The bot allows the server owner to run the add and remove commands automatically. However, there is some complexity in deciding who gets to execute the commands in your servers otherwise. For regular sync (one to many) we can simply set a single role id from the main server that can run the commands. However, for the reverse sync (many to one) a single role id does not exist in all synced servers, so we must use the roles name instead.
Enter allowed role id – Regular Sync Only
This role id needs to hold the id of a role in the main server. Members that have been assigned this role in the mainserver will be allowed to run the /add and /remove commands.
"allowedRoleId": "123456789123456789"
This value is only used in runSync.js
If you are running reverseSync.js then you can delete this line or leave it as it is in the example config
Enter allowed role name – Reverse Sync Only
This role name needs to hold a name of the role that exists in each of the synced servers that tells the bot which users are allowed to run the /add and /remove commands.
"allowedRoleName": "admin"
This value is only used in runReverse.js
If you are running runSync.js then you can delete this line or leave it as it is in the example config
Enter where you want log messages to be posted
It’s always nice to know when things are working behind the scenes. So go ahead and create a private channel in your main server, and give SyncBot the permissions to read and send messages in that channel. Then copy the id of the channel into the config.
"logChannelId": "123456789123456789"
Registering the Commands
After you have finished filling out the config file it is time to register the slash commands so that they are usable on your server.
regular syncbot
For the use of regular syncbot, you need to run “node register.js” from the command line that you will be staring the bot at. This file exists in the syncbot directory, and relies on data you input into the config.
reverse syncbot
For the use of reverse syncbot, you will need to run “node registerGlobal.js”
Starting the bot
After registering the commands on your server, you are ready to start up the bot! Don’t forget, that the command you are about to run will need to stay running 24/7 for the bot to continuously sync roles between your servers.
regular syncbot
You should still be in the same folder where you ran the register command in your command line. From this same location, start the bot using the command node run.js
reverse syncbot
For reverse syncbot, start the bot from the same folder in the command line that you ran the register command, using the command node runReverse.js
Using the Bot
Now you are ready to use the commands to add and remove roles in both servers and the auto features will start working.
/add @role @user
regular syncbot
will add the role denoted to the user in the main server, and look up the role with matching name in each of the synced servers and add it to the user there
reverse syncbot
will add the role denoted to the user in the synced server, and look up the role with matching name in the main server and add it to the user there
/remove @role @user
regular syncbot
will remove the role passed in from the user in the main server, and look up the role with matching name in each of the synced servers and remove it from the user there
reverse syncbot
will remove the role passed in from the user in the synced server, and look up the role with matching name in the main server and remove it from the user there
/role-checker command
analyze option
will send a file to you in DM detailing role differences of your users across your servers
force-sync option
will force sync all users roles in the synced servers to match the main server roles they have, essentially it applies the changes suggested from the analyze command